
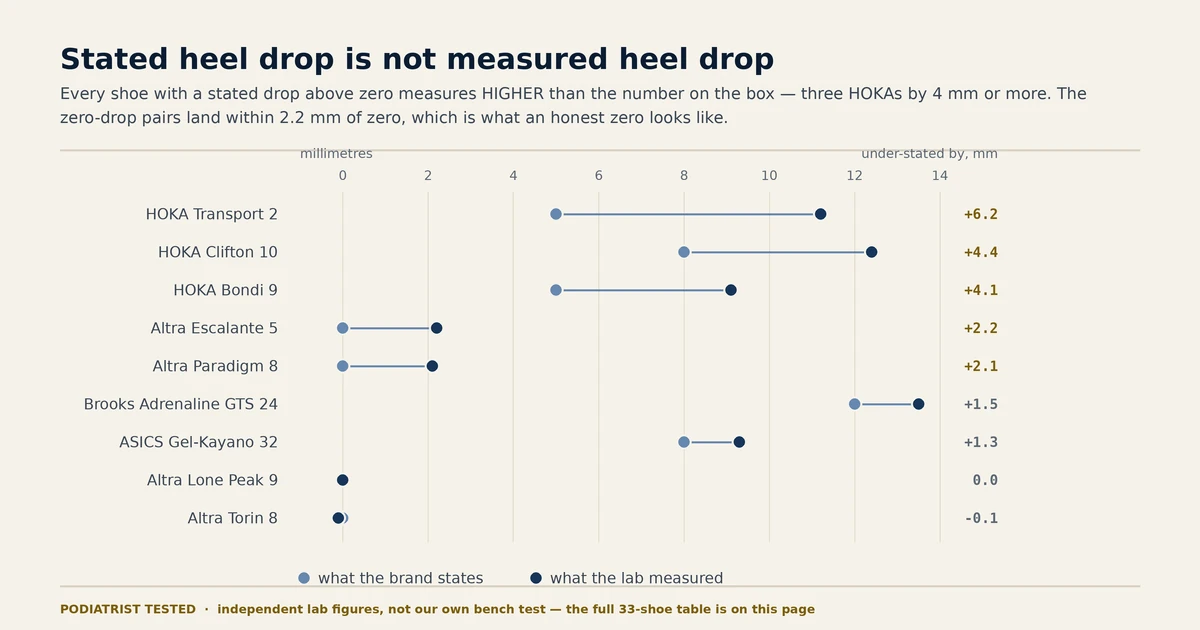
Heel-to-Toe Drop Chart: Stated vs Measured Drop for 33 Shoes (2026)
Stated drop against lab figures for 33 shoes. Every shoe with a stated drop above zero measures higher than the box — and the forefoot, not the heel, is why.
On this page
- The short answer
- How to read the chart
- The drop chart
- Which drop for which problem
- Why stated drop and measured drop disagree
- Where the missing millimetres actually are
- The brands that publish nothing
- What the brands publish, and what they leave out
- Drop versus stack: the mistake nearly everyone makes
- How to measure the drop of a shoe you already own
- Frequently asked questions
- What we are testing next
- Related guides & shoe pages
Testing status: the drop and stack figures in the chart below are the manufacturers’ published specifications, gathered from the brands’ own product pages — or, where the brand publishes nothing, from a named retailer spec table — and kept in one place so they can be compared. Where an independent laboratory has cut a shoe in half and measured it, that figure is shown separately and attributed to them. Nothing on this page carries a score or the seal; our own measured numbers will replace the borrowed ones model by model as each pair goes through the protocol — see How We Test.
The short answer
Heel-to-toe drop is the height difference between the heel and the forefoot of a shoe, in millimetres. A 12 mm shoe tips you forward off a raised heel; a 0 mm shoe stands you level. It is the most clinically useful number on a shoe box, because it decides how much work the calf and Achilles do and how much load lands on the forefoot — and it is the number most shoe reviews skip.
The useful version, in one line: problems behind the ankle want more drop; problems in the front of the foot want less. An irritated Achilles or a tight calf is happier at 8–12 mm. A bunion, a neuroma or a forefoot that needs room is usually happier at 0–6 mm with a wide toe box. Plantar fasciitis sits in the middle and cares more about heel-counter stiffness than about drop. The chart below groups every shoe we cover by its stated drop; the table under it says which band suits which problem.
One warning before you use any spec sheet, including this one. The printed drop is frequently not the measured drop. When laboratories cut these shoes in half, the HOKA Bondi 9 — sold as a 5 mm shoe — measured 9.1 mm, the Clifton 10 measured 12.4 mm against a stated 8 mm, and the Altra Paradigm 8, sold as zero, measured 2.1 mm. Treat the stated number as the brand’s intention and the measured number, where one exists, as the fact.
How to read the chart
- Stated drop — heel stack minus forefoot stack, as published by the brand. Lower means the heel sits closer to the ground relative to the ball of the foot.
- Measured drop — an independent cut-in-half laboratory measurement where one has been published, attributed to RunRepeat. An em dash means nobody has measured that model, including us, and the stated figure is all anyone has.
- Heel stack — total material under the heel. A different question from drop, and often the more important one: a 0 mm-drop shoe with 30 mm of stack (Altra Torin) and a 0 mm-drop shoe with 6 mm of stack (Merrell Vapor Glove) have nothing in common underfoot.
- Weight — the brand’s published men’s figure. Brands rarely state which size they weighed, which is itself worth knowing.
The table scrolls sideways on a phone. Nothing in it is ranked, and no shoe here has been through our bench yet.
The drop chart
| Stated drop | Shoe | Measured drop | Heel stack | Weight | MSRP | Our guide |
|---|---|---|---|---|---|---|
| 0 mm | Altra Torin 8 | −0.1 mm | 30 mm | 287 g | $150 | Zero drop |
| 0 mm | Altra Torin 9 | — | 28 mm | 269 g | $160 | Zero drop |
| 0 mm | Altra Paradigm 8 | 2.1 mm | 30 mm | 278 g | $170 | Zero drop |
| 0 mm | Altra Escalante 5 | 2.2 mm | 24 mm | 269 g | $140 | Zero drop |
| 0 mm | Altra Lone Peak 9 | 0.0 mm | 25 mm | 295 g | $140 | Zero drop |
| 0 mm | Topo Magnifly 6 | — | 26 mm | 255 g | $140 | Zero drop |
| 0 mm | Xero HFS II | — | not stated | 235 g | $130 | Zero drop |
| 0 mm | Merrell Vapor Glove 7 | v6: 0.0 mm | 6 mm | ~181 g | $110 | Zero drop |
| 5 mm | HOKA Bondi 9 | 9.1 mm | 43 mm (retailer) | 298 g | $175 | HOKA for PF |
| 5 mm | HOKA Transport 2 | 11.2 mm | not published | — | $150 | HOKA for PF |
| 5 mm | Topo Athletic Ultrafly 6 | — | 32 / 27 mm | 272 g | $150 | Ingrown toenails |
| 6 mm | Brooks Ghost Max 4 | — | 40 / 34 mm | not published | $165 | Turf toe |
| 6 mm | New Balance 1080v15 | — | not published | 261 g | $170 | Turf toe |
| 6 mm | New Balance 880v15 | — | not published | 299 g | $150 | Standing all day |
| 6–8 mm* | New Balance 860v15 | — | 40 / 34 mm (retailer) | 331 g | $150 | Arch support |
| 6 mm | Saucony Guide 19 | — | retailer figures conflict | 275 g | $150 | Tarsal tunnel |
| 6 mm | HOKA Gaviota 6 | — | 39 mm (third-party) | 291 g | $180 | Arch support |
| 8 mm | HOKA Clifton 10 | 12.4 mm | not published | — | $150 | HOKA for PF |
| 8 mm | HOKA Clifton 11 | — | not published | 283 g | $155 | Plantar fibroma |
| 8 mm | HOKA Arahi 8 | — | 39 mm (third-party) | 278 g | $150 | Arch support |
| 8 mm | HOKA Arahi 9 | — | 39 / 31 mm (retailer) | 284 g | $155 | Tarsal tunnel |
| 8 mm | ASICS Gel-Kayano 32 | 9.3 mm | 40 mm stated · 39.9 mm lab | — | $165 | Arch support |
| 8 mm | ASICS Gel-Kayano 33 | — | not published | 298 g | $170 | Tarsal tunnel |
| 8 mm | ASICS Gel-Nimbus 28 | — | not published | 281 g | $170 | Standing all day |
| 8 mm | ASICS GT-2000 15 | — | not published | 252 g | $150 | Plantar fasciitis |
| 10 mm | Brooks Ghost 17 | — | not published | — | $140 | Plantar fasciitis |
| 10 mm | Brooks Ghost 18 | — | 36 / 26 mm (retailer) | 289 g | $150 | Plantar fibroma |
| 10 mm | Brooks Adrenaline GTS 25 | — | 37 / 27 mm (retailer) | 300 g | $155 | Ingrown toenails |
| 10 mm | KURU ATOM 2 | — | 28 mm | 371 g | $169 | Arch support |
| 11 mm | Propet Stability X | — | not published | not published | $117 | Ingrown toenails |
| 11 mm | Propet Stability Walker | — | not published | not published | $145 | Charcot foot |
| 12 mm | Brooks Adrenaline GTS 24 | 13.5 mm | 39 mm | — | $140 | Arch support |
| 12 mm | Brooks Addiction Walker 2 | — | not published | 411 g | $140 | Charcot foot |
*The New Balance 860v15 is listed at 6 mm by some retailers and 8 mm by others; New Balance does not publish the figure. Where a brand publishes nothing, the cell says so rather than guessing.
Which drop for which problem
Drop is one variable among several and never the whole answer — heel-counter stiffness, torsional rigidity, forefoot rocker and toe-box width all matter, and for some conditions they matter more. But if you are standing in a shop holding two shoes, this is how a foot and ankle surgeon would use the number on the box.
| If this is your problem | Drop band | Why, and what matters more |
|---|---|---|
| Achilles tendinopathy, especially insertional | 8–12 mm | Raising the heel shortens the calf–Achilles unit and cuts tension at the tendon. This is the one condition where drop is the primary lever. Do not go low while it is sore. |
| Tight calves, or a history of calf strains | 8–12 mm | Same mechanism. Lower the drop only after the calf has been stretched and strengthened for a season. |
| Plantar fasciitis | 6–12 mm | A little heel lift offloads the fascia’s attachment, but a stiff heel counter, torsional rigidity and a forefoot rocker matter more than the drop number. |
| Metatarsalgia, Morton’s neuroma, bunions, hammertoes | 0–6 mm, wide toe box | Less heel means less forward pressure into the forefoot — but toe-box width and a cushioned stack are the features that actually decide comfort here. |
| Hallux rigidus (a stiff, arthritic big toe) | Any drop | Drop is not the lever. You want a rigid forefoot and a rocker so the joint does not have to bend. |
| Patellofemoral knee pain | 4–8 mm | Lower drop tends to shorten stride and soften the heel-strike loading rate. Watch the Achilles as you come down. |
| Flat feet, posterior tibial tendon problems | 6–10 mm with real structure | Structure, a firm heel counter and midfoot support beat any drop figure. Zero drop with no structure is the wrong direction. |
| Neuropathy, or diabetes with reduced sensation | 6–10 mm, cushioned, protective outsole | Never minimal, at any drop. Protection from the ground is the whole point. |
| Heavier runners and walkers | 8–12 mm to start | Body weight multiplies forefoot load. Come down a band at a time, and only from a cushioned stack. |
| Standing all day on hard floors | 6–12 mm, cushioned | Comfort over twelve hours is about stack, midsole resilience and fit. Move to a lower drop on days off first, never on a shift. |
One caveat the table cannot carry: the sport decides what is available to you, and not in the way most people assume. Nineteen shoes have now been cut in half by the same laboratory, and they fall into two camps rather than three. Tennis shoes measure a median 11.0 mm of drop and running shoes 11.2 — effectively the same. Basketball shoes measure 6.3, and not one of the seven reaches 10 mm. So a plantar-fasciitis foot that wants the upper half of that 6–12 mm band can have it on a tennis court and cannot have it on a basketball court, whatever the shoe.

The model-by-model figures are in basketball shoes for plantar fasciitis and tennis shoes for plantar fasciitis, each with the heel-counter and stiffness figures that go with them.
Two rules override the table. First, do not change drop and cushioning at the same time: going from a 12 mm cushioned trainer to a 0 mm minimal shoe changes two things at once, and that is how people end up with metatarsal stress fractures. Second, do not change drop during a flare — wait until the tissue is quiet, then move one band at a time over a season. Our zero drop guide has the full transition protocol.

Why stated drop and measured drop disagree
No standard forces a brand to measure drop a particular way, and there are several honest reasons the numbers move.
- With or without the sockliner. A moulded insole can be 4 mm thick at the heel and 2 mm at the forefoot, adding 2 mm of drop the midsole spec does not include. Take it out to fit an orthotic and you have changed the drop of the shoe.
- Where you put the caliper. Heel stack is quoted at a point set back from the rear of the shoe; move the measurement a centimetre and the number changes.
- Manufacturing tolerance. Foam compresses differently batch to batch. A couple of millimetres either way is normal, which is why a shoe sold as zero can measure 2 mm and still be an honest zero-drop design.
- Marketing. Drop bands are a category — 4 mm sells to one buyer and 8 mm to another — and the temptation to round toward the band is obvious.
None of this makes the spec useless. It makes the difference between an 8 mm shoe and a 10 mm shoe meaningless, and the difference between a 0 mm shoe and a 10 mm shoe real. Use drop to choose a band, not to split hairs.
Where the missing millimetres actually are
The obvious explanation for a shoe measuring higher-drop than it is sold as is that the heel is taller than the brand says. On the five shoes where the brand publishes both stack heights and the lab has measured both, that is not what is happening. The heel is close to right. The forefoot is thinner than stated on every single one.

| Shoe | Heel stated | Heel measured | Heel error | Forefoot stated | Forefoot measured | Forefoot error | Drop stated | Drop measured | Drop error |
|---|---|---|---|---|---|---|---|---|---|
| HOKA Bondi 9 | 43 | 41.3 | −1.7 | 38 | 32.2 | −5.8 | 5 | 9.1 | +4.1 |
| HOKA Clifton 10 | 42 | 44.4 | +2.4 | 34 | 32.0 | −2.0 | 8 | 12.4 | +4.4 |
| Brooks Adrenaline GTS 24 | 39 | 39.0 | 0.0 | 27 | 25.5 | −1.5 | 12 | 13.5 | +1.5 |
| ASICS Gel-Kayano 32 | 40 | 39.9 | −0.1 | 32 | 30.6 | −1.4 | 8 | 9.3 | +1.3 |
| Brooks Ghost 17 | 36.5 | 36.2 | −0.3 | 26.5 | 25.8 | −0.7 | 10 | 10.4 | +0.4 |
All figures in millimetres. Stated figures are the brands’ own published specifications; measured figures are RunRepeat’s laboratory results for a single retail pair of each shoe. Error is measured minus stated, so a negative number means the shoe has less material than the brand says.
Three things fall out of that table, and the third is the one worth carrying into a shop.
- Heel stack is honest. The five errors run from −1.7 mm to +2.4 mm and they land on both sides of zero, which is what ordinary measurement noise looks like. Averaged across the five, the heel error is essentially nil.
- Forefoot stack is not. Every shoe measured lower than stated — by 0.7, 1.4, 1.5, 2.0 and 5.8 mm. Not one measured higher. A one-sided result on five out of five is the part that makes this worth writing down.
- Drop is heel minus forefoot, so a thin forefoot inflates drop exactly as a tall heel would. On four of the five, the forefoot shortfall alone accounts for the whole discrepancy; only the Clifton 10 also has a genuinely taller heel than its spec. The Bondi 9 is the clearest case: its heel measured 1.7 mm shorter than stated, and it still came out 4.1 mm higher-drop, because the forefoot lost 5.8 mm.
Why this matters more than the drop number does
Forefoot stack is not a trivia figure. It is the material between the metatarsal heads and the pavement — the cushioning that decides how hard a shoe is under the ball of the foot. It is the number that matters for metatarsalgia, for sesamoiditis, for Morton’s neuroma and for anyone who has had a metatarsal stress fracture. A shoe advertised with 38 mm under the forefoot that measures 32.2 mm has about fifteen per cent less than advertised, and the shortfall is in the one place those patients cannot afford to lose it.
The direction of the error also cuts differently depending on what you came for. If you are buying drop — a higher heel for Achilles tendinopathy, say — these shoes err in your favour: you get slightly more drop than the box promises. If you are buying forefoot protection, they err against you. So when a shoe is chosen for forefoot pain, treat the published forefoot figure as an upper bound, and prefer a shoe with a stated forefoot stack comfortably above the minimum you think you need.
Two honest limits on this. It is five shoes, measured by one laboratory, on one retail pair each — nothing here is a controlled study, and a sixth shoe could break the pattern tomorrow. And there is a mundane candidate explanation we cannot rule out: brands may quote forefoot stack with the sockliner in, and the lab measures the midsole. That would produce exactly this signature. Either way the practical conclusion is the same, because the number you are being sold is not the number under your metatarsals.
The brands that publish nothing
Dansko, Dr. Comfort, Apex, Vionic and parts of the New Balance and Propet ranges do not put heel-to-toe drop on their product pages, and several publish no stack height or weight either. That is not a criticism of the shoes — the Dansko Professional and the Dr. Comfort William are both sensible clinical choices, and they appear in our Charcot foot and diabetic shoe guides for good reasons. It does mean nobody can compare them on this number without measuring the shoe, which is exactly the gap this site exists to close. These models are near the front of our bench queue, because they are where our own figures will add the most.
What the brands publish, and what they leave out
That gap is wider than a handful of comfort brands. Every specification on every shoe page here carries a note saying where the figure came from, so we can count it. Across all twenty-six shoes reviewed on this site, this is how often each number came from the brand itself, how often we had to take it from a retailer’s spec tab or an independent reviewer, and how often it does not appear anywhere at all.
| Specification | From the brand | From a retailer or reviewer | Nowhere | What that tells you |
|---|---|---|---|---|
| Price (MSRP) | 25 | 0 | 1 | The number that closes the sale. |
| Widths available | 24 | 0 | 2 | Cheap to publish, and it sells the wide-footed customer. |
| Heel-to-toe drop | 23 | 1 | 2 | The spec runners shop on — and, as the chart above shows, the one most often wrong. |
| Weight | 17 | 6 | 3 | Usually published, but only two brands say which size they weighed. |
| Heel stack height | 9 | 14 | 3 | Published on barely a third. Yet drop is heel stack minus forefoot stack, so without it the drop figure cannot be checked. |
| Forefoot stack height | 8 | 14 | 4 | The material over your metatarsal heads. Least published, and — see above — least accurate. |
| Toe-box width, internal | 0 | 5 | 21 | Not one brand, on any of the twenty-six. The five figures we hold come from an independent lab. |
Out of twenty-six shoes. This counts where the figure on our page had to come from — not a claim about everything a brand has ever published. If a brand publishes a number we did not find, we would rather be corrected: tell us and we will change the row and the note.
The pattern is consistent, and it is not really about secrecy. Brands publish the numbers that sell a shoe — price, the widths it comes in, the drop band it belongs to — and leave out the numbers that decide whether it fits your foot and how much material sits under the part of it that hurts. Stack heights are published on about a third of the shoes here. Internal toe-box width is published on none of them, which is why the toe-box table on this site had to be assembled from laboratory figures, and why a width letter is the only fit information most buyers ever get.
It also explains the shape of the error in the section above. The forefoot figure is the one brands are least likely to publish and the one that measured furthest from the spec when a laboratory checked it. A number nobody has to stand behind is a number that drifts.
Drop versus stack: the mistake nearly everyone makes
People arrive in clinic having decided that low drop is good or bad, when what they actually mean is minimal or cushioned. They are separate dials. Drop changes the angle the foot sits at, and so where load lands and how long the calf works. Stack changes how much material sits between you and the ground, and so impact and stability. Any combination exists: a HOKA Bondi is high stack and low-ish drop; an Altra Torin is high stack and zero drop; a Merrell Vapor Glove is minimal stack and zero drop; a Brooks Adrenaline is moderate stack and high drop. The calf and Achilles risk lives in the drop column; the metatarsal and stress-fracture risk lives in the stack column.
How to measure the drop of a shoe you already own
- Take the insole out and set the shoe on a flat table.
- Measure the outside height of the midsole at the middle of the heel, from the table to where the upper meets the foam. A digital caliper or a steel rule works; a tape measure does not.
- Measure the same way at the widest part of the forefoot, under the ball of the foot.
- Subtract. That is the midsole drop, without the insole.
- For the drop you actually stand on, measure the insole’s thickness at heel and forefoot and add the difference back in. This is the number that changes when you swap the sockliner for an orthotic — see our insoles guide.
Do it to an old pair before you buy. Measuring the shoe that has been comfortable for two years tells you more about what you need than any review does.
Frequently asked questions
Is a higher or lower heel-to-toe drop better?
Neither, on its own. A randomised trial of more than 500 recreational runners assigned to 10 mm, 6 mm and 0 mm drop shoes for six months found no overall difference in injury rate. Drop matters for you — for the tissue that hurts and for what you have been wearing — not in general.
What heel drop is best for plantar fasciitis?
Most people with heel pain do well between 6 and 12 mm, because a little heel lift takes tension off the fascia’s attachment and off a tight calf. But drop is not the main feature here: a stiff heel counter, a sole that does not fold in the middle and a forefoot rocker matter more. Our plantar fasciitis guide ranks shoes on those.
What heel drop is best for Achilles tendonitis?
Higher. Raising the heel shortens the resting length of the calf–Achilles unit and reduces tension at the tendon, which is why a heel lift is standard first-line advice. Aim for 8–12 mm while the tendon is irritated, and do not move to a low or zero drop shoe until it has been quiet for months. Our Achilles guide is ranked by drop for this reason.
Do HOKAs have a low heel drop?
HOKA builds most road models around a stated 5 to 8 mm, which is lower than a traditional trainer, but they are high-stack shoes with a pronounced rocker, so they do not behave like low-drop shoes. Measured figures also run higher than stated: 9.1 mm on the Bondi 9 and 12.4 mm on the Clifton 10 in one laboratory. Low drop and minimal are not the same thing.
How long does it take to adapt to a different drop?
Muscle adapts in three to four weeks; tendon and bone take eight to twelve. Move one band at a time — 12 mm to 8 mm, not 12 mm to 0 mm — keep the old pair in the rotation, and treat morning-after pain over the metatarsals or at the heel cord as a stop sign.
Does the insole change the drop?
Yes, and it is the most commonly missed variable. Most factory sockliners are thicker at the heel than the forefoot, adding a millimetre or two of effective drop. Swap one for a flat orthotic and you have lowered the drop of the shoe without changing the shoe. If a new orthotic made your calf ache, this is usually why.
What we are testing next
Every shoe in this chart is queued for the bench: heel and forefoot stack with calipers at fixed landmarks, with and without the sockliner, so a measured drop can sit beside every stated one; weight on our scale at men’s 10; internal toe-box width and depth; the three stability checks; and an Orthotic Volume Rating taken with a real custom device and the stock insole removed. As each model is measured, its row here gains a measured figure and stops relying on the brand’s number. The models from brands that publish nothing at all go first.
Using these charts. Reproduce them wherever you like — an article, a newsletter, a lecture slide, a forum post — provided the images are unaltered and you credit Podiatrist Tested with a link to this page. No permission needed, no fee, and you are welcome to host the file yourself.
Credit line to copy: Chart: Podiatrist Tested — podiatristtested.com/heel-to-toe-drop-chart/
The figures themselves are the brands’ and the laboratory’s, and facts belong to nobody — we claim nothing over the numbers, only over the chart. If you want a different crop, a print-resolution file, or the underlying table as a spreadsheet, ask us and we will send it.
Related guides & shoe pages
- Zero drop shoes — who should and shouldn’t wear them
- Best shoes for Achilles tendonitis — ranked by heel drop
- Best shoes for plantar fasciitis
- Wide toe box shoes
- Best shoes for metatarsalgia
- Best insoles for plantar fasciitis
- Shoe width chart — what 2E and 4E actually mean
- How we test — and what the Orthotic Volume Rating measures
- Shoe weight chart — every shoe here by published weight
Where drop matters most clinically. The situation where heel-to-toe drop stops being a preference and becomes a rehabilitation decision is coming out of a boot after an Achilles rupture — see best shoes after Achilles tendon rupture surgery.
Recently reviewed
Individual shoe pages state their evidence tier, published measurements and who should skip them.
HOKA Bondi SR
Spec AnalysisUntested. HOKA publishes the drop, the weight and the price, but no stack height at all and no slip-resistance standard on a shoe whose name is Slip Resistant.
Dansko XP 2.0
Spec AnalysisOccupational clog with a removable dual-density footbed and slip-resistant outsole — not yet tested.
Orthofeet Coral
Spec AnalysisExtra depth, published quarter-inch removable insole, four widths A–2E, 15.7 mm drop — not yet tested.
Measured, worn, scored — never sponsored
No brand has ever paid for a review, a score, a ranking or the seal. Where we earn a commission the link says so, and the score does not change.